Want to improve your Google Shopping feed, but don’t know how to go about it?
You’ve come to the right place.
I’m going to show you 15 Google Shopping feed optimization tips with our own examples, case studies from industry leaders and useful BONUS tips that will make sure your feed gets RESULTS in 2019.
Here are the tips covered in this post:
- Tip 1: Front-Load Your Product Titles With Useful Information
- Tip 2: Write Good Product Descriptions
- Tip 3: Pick the right Google Product Categories
- Tip 4: Make Your Product Types As Granular As Possible
- Tip 5: Make Use of Merchant Promotions
- Tip 6: Set Up Product Ratings
- Tip 7: Optimize Your Product Images
- Tip 8: Price Your Products Competitively
- Tip 9: Give Free Shipping A Try
- Tip 10: Apply Custom Labels For Advanced Segmentation
- Tip 11: Use Feed Rules For Mass Changes
- Tip 12: Start Using Feed Management Software
- Tip 13: Set up Automatic Item Updates
- Tip 14: Sign Up for Local Inventory Ads
- Tip 15: Constantly monitor your Diagnostics tab
Tip 1: Front-Load Your Product Titles With Useful Information
When it comes to Google Shopping, product titles are one of the most decisive factors in getting your ads clicked. Period.
Not only will a good product title help Google show your ads to the right audiences, but it can also increase your Impressions, Clicks, and CTR.
In fact:
As reported by the FindWAtt team, enhancing product titles can result in a 71% increase in Impressions, a 151% increase in the number of Clicks and a 47% increase in CTR.
How could they have done it with just product titles, you ask?
There’s been a lot written on the topic, but the easiest way to explain the impact of title optimization is the following example:
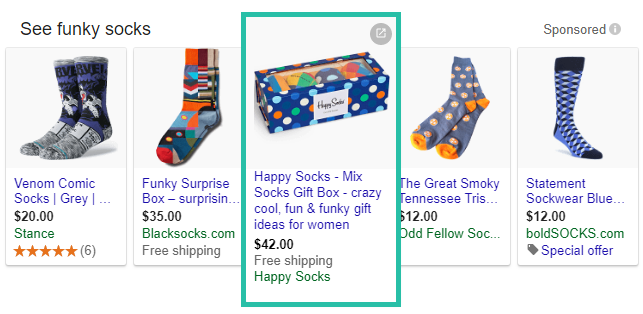
Which would you rather click?
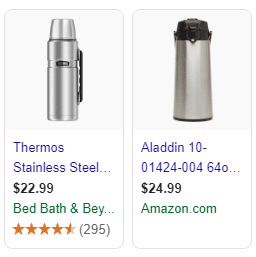
I bet it’s the Stainless Steel Thermos to your left, and it’s not just because of the 4.5-star rating, the slightly lower price or the more appealing design. It’s because the second product’s title fails to convey any information about it other than the brand and the product ID.
So how do you optimize your product titles to get such results?
The way most people approach Title optimization is this:
- Take product’s original title
- Add all of the keywords and attributes amazon-style
- Hope for the best
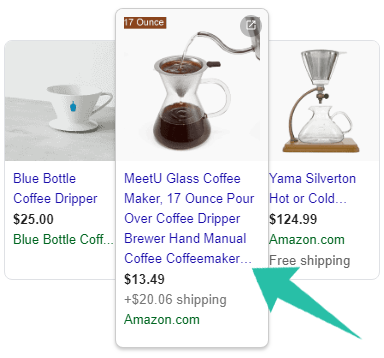
What you end up with is one of these gems:
Your Product Title is one of just 4 elements appearing below your product image and the one you can change with the least effort and investment.
It’s really the only element you can easily change without having to:
- Change your pricing
- Cut margins by offering free shipping
- Retake your product photos
- Create merchant promotions (and cut margins)
One of my favorite ways to optimize Product Titles is this two-step approach called Front-Loading Product Titles.
Step 1: Make your product titles keyword-fronted.
Piggybacking off of one of the primary on-page SEO tactics called Keyword Front-Loading, which contributed to Ahrefs’ 37% increase in traffic for one of their articles, keyword front-loading your product titles helps both Google and your potential shoppers understand what your product is and whether it’s what they’re looking for faster.
How does this work?
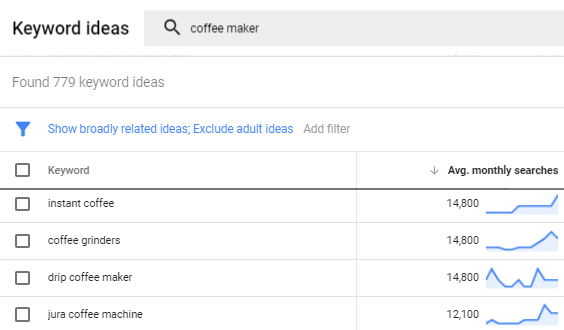
- Go into your AdWords account and navigate to the Keyword Planner tab.
- Now perform a search for your product type, let’s say it’s a ‘coffee maker’. Find the most popular and relevant version of your product type (it’s ‘drip coffee maker’).
- Place this keyword in front of your product title.
Step 2: Include only relevant product attributes in the title.
Including relevant product attributes is different to the Amazon-style attribute stuffing, it helps potential shoppers understand product specifics before clicking your ads, ensuring not only that you get more relevant Clicks, but that you don’t waste your budget on shoppers looking for different product variations.
Which relevant product attributes should you include?
It depends on your product, your industry, and your approach, but generally, I prefer the following formulas:
Keyword+Brand+Size+Color+other relevant information
Brand+Keyword+Size+Color+other relevant information
Example: French Press by Secura – 34 ounce – 18/10 Stainless Steel
Don’t do this:
Audience- or occasion-specific targeting in ad copy is a great idea. However, be careful not to make your ad copy overly specific as it can drive away potential customers.
Bonus tip:
Remember, you’re allowed to upload 150-character-long product titles, but Google will truncate everything over 70 characters (which will appear on hover), so if you want to avoid having your important information truncated, shorten your titles and/or put the most important information closer to the beginning.
Another bonus tip:
Once you’ve generated enough click and transaction data, I recommend testing Crealytics’ approach from earlier and front-loading your best-performing search terms in your titles for even better results.
Once you’ve optimized your product titles, it’s time to look at your product descriptions…
Tip 2: Write Good Product Descriptions
Here’s the deal:
There’s no conclusive data on whether Product Descriptions make a difference in Click-Through Rates or Sales.
Trust me, I’ve done my own testing and read over 50 resources on Google Shopping.
However, the big question is:
Are you willing to skip them and risk limiting your results?
I don’t. Which is why I always optimize my product descriptions.
Still, some argue that there’s no point in optimizing something that most shoppers don’t even see.
After all, a product description appears only when you navigate to the Shopping tab and click on products and only a handful of customers do that.
Well, to them I say that with Google Shopping generating over 85% Paid search clicks across US advertisers according to this research by Adthena, I think it’s only a matter of time until Google re-invents the Shopping tab experience and incorporates more product information to improve the user experience further and you don’t want to be the only one losing clicks to weak descriptions.
How to optimize it:
When it comes to optimizing your product descriptions, I recommend sticking to usefulness over keyword-stuffing.
So, instead of listing every conceivable attribute, your description should serve as an extension of your product title with only the relevant keywords sprinkled it, providing lacking information that’s relevant to shoppers first, Google second.
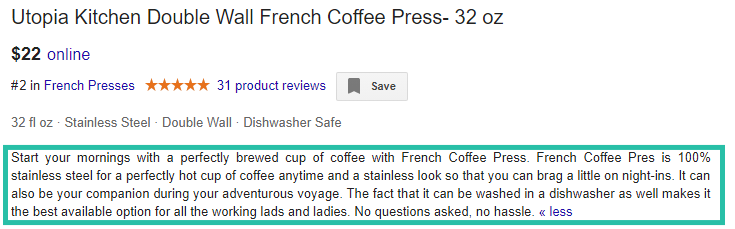
Here’s what a good product description looks like:
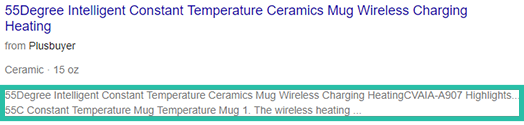
Here’s what a bad product description looks like:
Another approach to product description is this simple structure proposed by GoDataFeeds’ Bryan Falla:
- Size
- Shape
- Pattern
- Texture
- Design
- Material
- Intended age range
- Special features
- Technical specs
Bonus tip:
Despite allowing 5,000 characters, Google will often truncate your product description at just 175 Characters without the option to expand for more, so similar to Product Titles, I suggest putting all of the important information at the beginning of your description.
Over to a Google Shopping feed optimization basic, but one that you HAVE to get right or risk delaying your launch…
Tip 3: Pick the right Google Product Categories
You know that Google product categories are required only for clothing, shoes, sunglasses, handbags, watches and a number of media-related products, but what about all of the other products?
Should you just save time and leave them blank?
The answer is no, it’s just as important to assign product categories across all of your products, as it will directly impact how well Google is going to be able to match your products to the right queries.
Because here’s what happens if you don’t:
How to optimize it
Go through this beautifully formatted (kidding) Product Taxonomy file provided by Google and find the right categories. Remember, Google recommends categories that are at least 2-3 levels deep (i.e. Home & Garden > Kitchen & Dining > Kitchen Appliance Accessories > Coffee Maker & Espresso Machine Accessories)
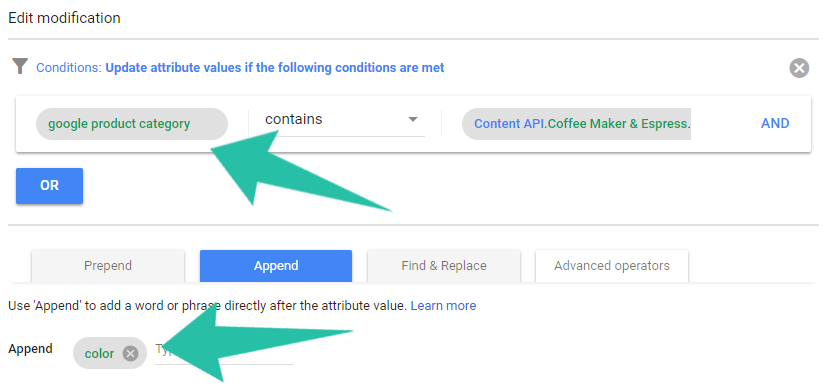
You can use a handy tool like Goo tax to simplify your search.
Remember, make it as precise as you can, so your high-converting coffee machine doesn’t end up showing up for generic kitchen appliance accessories and leave you guessing why it suddenly generated 1000s of impressions and 0 clicks.
Bonus tip:
You can pair Google Product Categories with Feed Rules to update your feed in a jiffy. Let’s say you want to add the color attribute to a specific category of products in your feed. Simply create a rule to append text to that category.
Let’s move on to a google shopping feed optimization technique that’s key to creating highly segmented (and converting) Google Shopping campaigns.
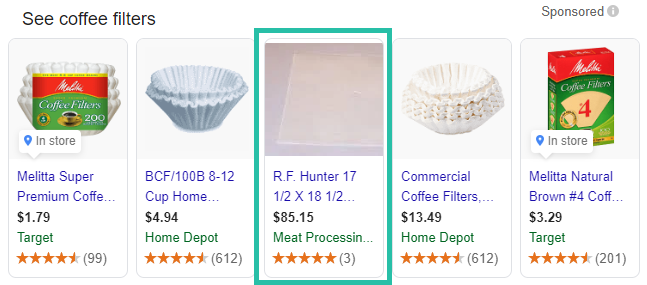
Tip 4: Make Your Product Types As Granular As Possible
Product types can be thought of as your own product categories, which can be used to help segment your campaigns, influence your bidding or add an additional layer of data to your reporting.
When using e-commerce platforms (such as Shopify), your product types can be mapped as your store categories and can look like this:
- Drip Brewers
- Grinders
- French Presses
- Coffee Filters
How exactly do product types influence bidding, you ask?
Want to see how Grinders, as a type2 product type, perform compared to French Presses? Product Types.
Want to see how a sub-category(Hand Grinders) performs compared to another one (Electric Grinders)? Product Types.
Having found that your Hand Grinders are generating a lower ROAS compared to Electric Grinders, you’d like to reduce your Hand Grinders’ bids by 10%? Product Types.
Despite them being an optional attribute, I always recommend adding product_type to your shopping feed as you can find multiple uses for it and help Google better understand your products and match them to relevant product searches.
Another use case for product types (or custom labels) is campaign segmentation based on high and low performers.
As described in this case study by Hanapin’s Matt Umbro, using product types to split their client’s campaigns on top products vs. poor performers, allowed Matt to use the budget more effectively and lead to an increase in the number of Impressions and Clicks, which ultimately resulted in a 25.57% increase in Revenue.
How to optimize it:
Simple, follow Google’s string format and ensure your product types are as granular as possible. Remember that you can filter your product type data up to 5 levels only, so don’t overdo it.
Product type example: Appliances > Coffee Grinders > Hand Grinders
Something to watch out for:
When preparing your feed I’d recommend double-checking your product types and ensuring all of them are properly assigned.
Bonus tip:
If you don’t want to come up with your custom product types, you can use the same values as for the google_product_category attribute. Most shopping feed management tools have an easy mapping functionality that allows you to get this done in a matter of minutes. Just remember that Google recommends adding just 1 string value.
Onto one of the most underused features of Google Merchant Center…
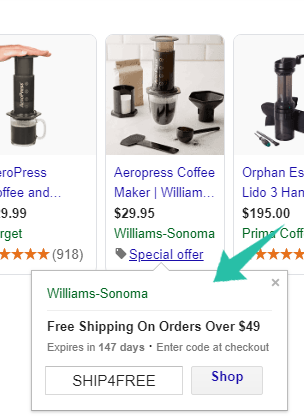
Tip 5: Make Use of Merchant Promotions
You’re using coupon codes in your store, right?
So why not do the same on Google, where everyone can check them out and buy into your promotion.
Merchant promotions (or “special offers”) is one of the most underused features I see when auditing new accounts and it’s one of the most impactful ones. These are Google-hosted coupon codes that you can apply at either Feed or Merchant Center level.
According to a case study from ThinkWithGoogle, Office Depot’s Viking Brand saw an ROI increase of 9.3% after enabling merchant promotions.
How to optimize it:
Before starting with Google Merchant Promotions you need to get whitelisted by submitting this form.
Takes you just 2 minutes to fill out and Google up to 1 week to review it (my experience) so submit it along with your product feed.
Keep in mind, your promotions need to be redeemable by all types of customers, and as such, you can’t use your newsletter subscription promotions or any promotions for specific groups of customers (first-time, specific payment method, etc.).
Google provides a clear list of admissible and inadmissible promotion types here.
Currently, there are 4 categories of promotions you can apply:
- Amount off
- Percent Off
- Free Gift
- Free Shipping
Here’s a list of merchant promotions examples you can try:
- Free product with $100 order
- 20% off $200 orders
- Free shipping on orders over $99
- Save $20 with a Bundle Deal
- Free accessory+One day delivery
- Free accessory+10% Reward Points
Bonus tip:
You can pair merchant promotions feed with your remarketing lists to convert your previous visitors by giving them an extra discount, free shipping or throwing in a free accessory.
Now that you’ve increased your CTR and Sales with Merchant Promotions, here’s another Google Shopping feed optimization technique that is sure to increase your CTR.
Tip 6: Set Up Product Ratings
Let me ask you a question:
When checking similar products from different advertisers, whether on Google Shopping, Amazon, Bing, etc., which one do you click on?
If you’re anything like me and are looking for a good value for money coefficient, chances are you picked Hario.
Not because you know it’s a trusted company, but because its rating stood out and people tend to trust positive ratings.
In fact, eMarketer Ecommerce Insights Report posted that from nearly 2 million respondents 24.4% said they always referenced ratings, while 40.8% said they did so often.
So, how do you set up product reviews?
First, make sure that you have at least 50 reviews across all of your products.
Next, submit this Product Reviews Interest Form, specifying the number of reviews per each score from 5-star reviews all the way to 1-star.
Once approved (takes up to 7 business days), you will be able to access the Product Reviews tab in Google Merchant Center.
Now all you need to do is submit an XML product reviews feed, set the desired frequency and you’re done. Feed review should take between 2 to 4 weeks.
While more expensive, I would definitely recommend collecting and submitting your reviews through a 3rd party review aggregator such as TrustPilot, Yotpo, Judge.me or Reviews.com. as there’s a much higher chance your reviews are going to get approved and inexplicably less work involved as you can set up automatic XML feed setup and daily feed updates.
By the way, your reviews will be verified for authenticity through cross-matching them with other sources, so make sure they are genuine.
Bonus tip:
I’ve personally found Judge.me to be the most cost-effective review aggregator for Shopify and WooCommerce with all of the essential features for a fraction of the price.
It even adds the right product review markup for SEO, like below.

Sidenote:
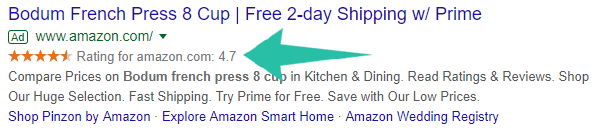
When talking about ratings, we need to make an important distinction: there are product ratings and seller ratings, which are not the same.
Product reviews are aggregated ratings from different sources(unless you have a unique product), so if both you and Lowe’s are selling the same lamp, Google can show Lowe’s product reviews for your products and vice-versa.
Seller ratings, on the other hand, are displayed in the Google Shopping tab.
While you might think it’s not worth it, consider their true benefit – they also double as seller extensions for Search ads, which works WONDERS for Search ads’ CTR.
And since Google search ads is a great supplementary channel for Shopping ads, it’s a feature I highly recommend enabling as well.
And here’s proof:
After enabling the Feefo’s seller reviews in Search ads, the recruitment giant Michael Page saw an increase of up to 50% in CTR.
Amazon knows this:
Over to the next optimization tip that can prove to be THE most impactful on your CTR…
Tip 7: Optimize Your Product Images
Your Google Shopping feed optimization priority should go like this:
1 – Images
2 – Titles
3 – Attributes
and so on…
So why do images take the first place?
Because they are the essence of Shopping ads.
The whole point of showcasing your products on Google Shopping is to show your product to the potential customers where they can see it faster and if you’re not doing a good job of presenting them in the best way possible, you’re not making the most out of your advertising.
A study conducted by MIT neuroscientists found that our brains can process up to 12 images in as little as 13 milliseconds.
Add a couple of seconds for title and price analysis and that’s how quickly it takes your potential customers to decide which products to click.
Walmart dropped the ball on this one:

When approaching your product images, make sure you follow this simple-to-follow checklist:

- Use a white background
- Use a high-quality picture
- Accurately present the item you’re selling
- Display the entire product and zoom-in on it
- Don’t use watermarks or promotional text
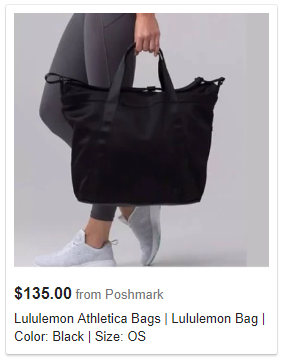
Bonus tip:
While it’s recommended to keep the background white and focus on the product you can test enhancing your images like Lululemon by showing the product in a relevant setting while keeping the main focus on the product.
I remember reading about this next optimization technique for the first time and thinking ‘No way would optimizing this affect the results so much’…
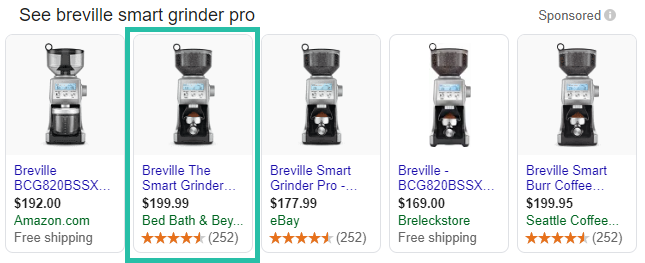
Tip 8: Price Your Products Competitively
Price competition is as old as, well, the competition itself, but did you know that pricing can affect your Google Shopping rankings as well?
According to this experiment performed by Crealytics, a mere 5% increase in price can lead to an up to 60% decrease in Clicks on Google Shopping.
How to optimize it:
If you want to get more clicks and sales through Google Shopping, you need to be aware of your competitors’ pricing and constantly reassess your per-product pricing to improve your CTR.
While this can be tedious on your own, some feed management software providers like Feedonomics or Pricing Lab offer it as a feature, which I haven’t tried personally, but it sounds kick-ass!
Be aware of your competitors’ pricing and if repricing your products isn’t an option, make sure you don’t overbid on higher priced items, like this advertiser.
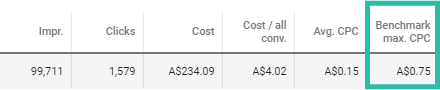
Bonus tip:
While still in beta, Google Price Benchmarks is an excellent feature that shows your competition’s average bids for the same products.
You can access these metrics by going to your Product Groups or Products tab and adding them to your column set (from under ‘Competitive metrics’).
Tip 9: Give Free Shipping A Try
Shipping can be as little as setting a $0 shipping fixed-rate in Google Merchant Center, or as much as assigning different shipping labels based on your product shipping categories (small, bulky, perishable, etc.) and creating a shipping rate table in Google Merchant Center and configuring a percentage of order shipping rates.
I always recommend trying free shipping if the margins allow.
Did you know that, according to this Marketing Land report, 9 out of 10 consumers say free shipping is the number 1 incentive to shop online?
How to optimize it:
In Google Shopping, free shipping can be offered in different ways:
- Free Shipping on all products no matter the cost
- Free shipping over 100 USD (as a shipping rate table)
- Free shipping as a coupon code
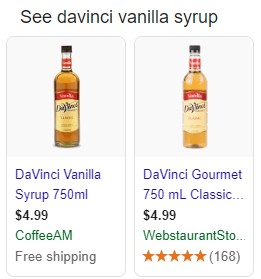
Another game of ‘Which one would you pick?’.
Would it be the DaVinci vanilla syrup from CoffeeAM with the promise of free shipping or the same option from WebstaurantStore with no such promise (even with its product ratings configured)?
If you’re already using product types for campaign structuring but thinking about turning it up a notch, this next feed optimization tip is for you.
Tip 10: Apply Custom Labels For Advanced Segmentation
Custom labels are the secret sauce of well-optimized Shopping campaigns.
In a nutshell, there are 5 custom labels (0-4) and they allow you to assign custom-defined tags to your products and segment them further based on Season, Margin, Sale, Price, Shipping or whatever else you want. The possibilities here are endless.
Clicteq’s data shows that product id segmentation (single product ad groups) can lead to an increase of up to 335% on Return on Ad Spend.
Custom Labels, in my experience, let you improve that further by allowing to segment your best-performing products based on margins or popularity and create best-seller campaigns, assigning higher bids or budgets.
Here’s an ever-growing list of the possible custom labels you can apply:
- Margin (<10%, <20%, <30%, <40%, <50%)
- Season (summer, autumn, winter, spring)
- Sale (your custom sale, Black Friday, Christmas)
- Price (below $20, below $50, below $100)
- Shipping (free shipping, 1-3 business days, 3-7 business days)
- Collection (your custom collection, 2019 collection, 2018 collection)
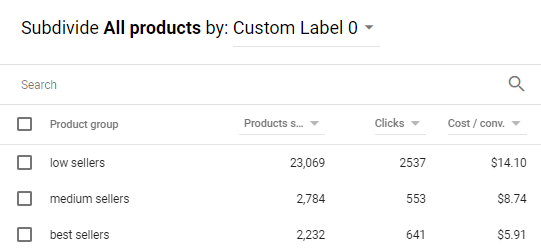
- Popularity (best-sellers, medium-sellers, low-sellers)
- Release Year (2016, 2017, 2018, 2019)
- Competitive Pricing (below average price, average price, above average price)
- A/B Testing Feed Attributes (updated images vs. old images)
Bonus tip:
As suggested by Reinhard Einwagner of Smarter Ecommerce, custom labels can even be used to test different hypotheses, such as competitive prices vs. usual prices and new products vs. older ones.
I’d add the already suggested feed attribute testing (new images vs old images and new titles vs old titles) to the list.
Tip 11: Use Feed Rules For Mass Changes
When it comes to making changes to your products en masse, you can’t underestimate the power of feed rules.
Want to update the product title to include the size/material/color? Feed rules.
Want to change the condition/gender/shipping attribute of all of your products at once? Feed rules.
Want to include a new term in your title, because you’ve just read my previous point mentioning the success Crealytics achieved by including search terms in their clients’ product titles? You guessed it – feed rules.
So let’s say you do want to replicate the awesome results achieved by Crealytics and increase your CTR by 18% by adding high-impression search terms from the Search Term Report to your title.
Go to your Google Merchant center account, and navigate to Products → Feeds → Click on your active Feed → Rules tab → Create rule → Type in your title → Add modification → Set condition → Prepend
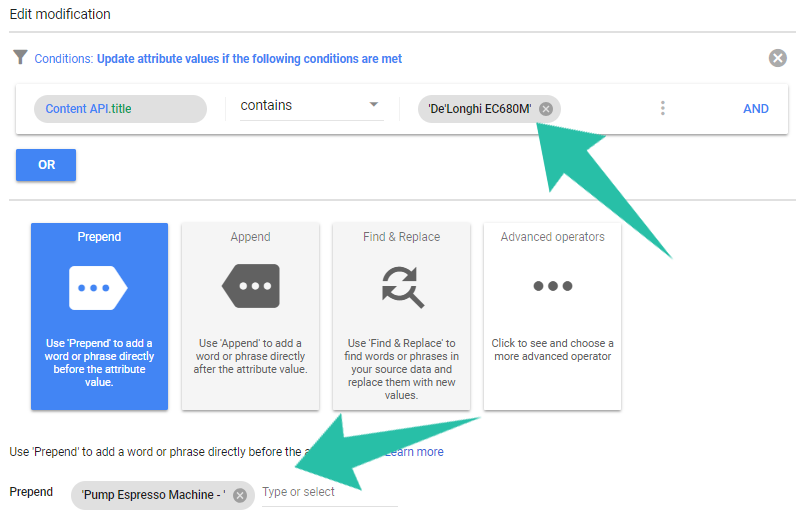
In this advertiser’s case, we have a best-seller coffee machine with its own ad group (SPAD) that generated the most conversions from pump espresso machine-related queries.
How to optimize it:
With feed rules, you have 4 types of data sources:
- Set to – change an attribute (i.e. set availability to ‘out of stock’)
- Extract – take out an attribute, remove part of the title
- Set to multiple – include or exclude Google channels the product is eligible for (Shopping, Display Ads, and Shopping Actions)
- Take latest – find the most recently updated attribute (price and availability only)
If you want to change the data in your feed, you get these 9 modification options:
- Prepend
- Append
- Standardize
- Add repeated field
- Optimize URL
- Find & Replace
- Calculate
- Split & Choose
- Clear
Keep in mind that you need to set conditions to filter the attributes that you want to change the data for, otherwise feed rules will be applied to all of your products.
Bonus tip:
Remember that certain changes are best applied at your store level instead of feed rules as you can easily get lost in the multitude of rules you set up and over-optimize your feed.
Tip 12: Start Using Feed Management Software
If you have over 100 products in your feed, definitely consider using feed management software.
You’ll thank yourself later when you have to update product categories, rewrite product titles, change product types, replace images, etc. manually in Google Sheets.
And with the prices being as low as $7/month per 1000 products it quickly pays for itself.
From my own experience:
If it weren’t for feed management software (DataFeedWatch in our case), we’d be spending 80% of our time manually updating the feeds.
Why you should get feed management software:
- Increase efficiency
- Launch your campaign sooner
- Automate manual tasks
- Connect with your store and rely on automatic product updates
- Add attributes in bulk
- Update attributes in bulk
- Add/Remove products in bulk
- Validate your data before posting
- Navigate your feed with ease
- Expand your feed to different channels
- Export your whole feeds
- Get optimization suggestions (if available)
- A/B Test different attributes
The best part?
There’s no need to buy the most expensive software right away.
If you’re just starting out, a simple solution like Google Shopping Feed for Shopify or Product Feed PRO for WooCommerce will do.
Test it first and see if it fits your needs. If not, you can always switch to the slightly more expensive DataFeedWatch or GoDataFeed with more features.
Bonus tip:
While doing research for this article, I stumbled upon Boostmyfeed, which offers a free data feed management plan with unlimited products and channels. I haven’t tried them myself, but the offer sounds very enticing.
Update: The app isn’t free anymore, unfortunately. You are now being asked to pay ~$10/month for unlimited products.
Tip 13: Set up Automatic Item Updates
Something most smaller advertisers omit is automatic item updates, a feature that seems too technical to make use of.
Well, trust me, it’s definitely worth the effort.
Automatic item updates is a merchant center feature that allows Google to update your product listing with the most current data regarding price and availability based on your schema markup ensuring that your changes are implemented right away and not whenever your re-submit your feed.

Another added benefit is the fact that by setting up Automatic Item Updates you will reduce the risk of getting your account suspended due to the website and feed price mismatches.
This is a big one.
Changing the price on even a couple of products at a time without having them updated can lead to item disapproval, which, if repeated too often can lead to the suspension of the whole account.
How to optimize it:
Automatic item updates are enabled by default, so what you should focus on is making sure your website uses properly structured data markup.
Structured data markup is a piece of HTML code that appears on all of your product pages and lets Google “read” your website and navigate to the necessary information.
You have three options for installing structured markup:
- Edit your PHP file yourself (great guides for Shopify, WooCommerce, and Magento)
- Hire a developer to do it
- Install one of the many plugins available (great plugins for Shopify, WooCommerce, and Magento)
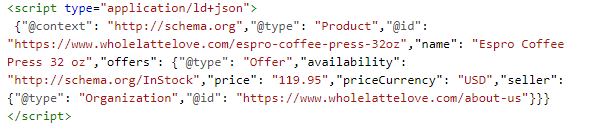
Here’s what a configured product markup looks like:
Bonus tip:
Automatic item updates don’t replace your feed submissions, so you should still submit your product feed as frequently as possible.
Next up is a must-have optimization for those with brick and mortar stores.
Tip 14: Sign Up for Local Inventory Ads
Did you know that you could promote in-store visits through Google Shopping?
A great option for the ones having both digital and physical presence, Local Inventory Ads are just that, they allow you to showcase your local inventory to local users.
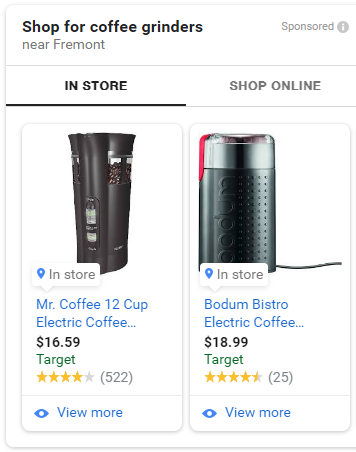
Here’s what Local Inventory Ads look like on mobile:
And here’s the data to make it more enticing:
According to a study conducted by the Local Search Association and Acquisio, 75% of local searches become in-store visits.
This means that you’re not making the most out of Google Shopping if you’re not using local inventory ads to promote in-store visits to everyone who needs to check the product in-person before making a decision.
How to optimize it:
To set up Local Inventory Ads, you need to do the following:
- Set up Google My Business(GMB) locations
- Link your GMB account with your Google Ads account
- Enable Local Inventory Ads inside your Merchant Center programs tab
- Verify your About Us page (here’s how)
- Create a local products feed (similar to your main shopping feed, but additionally including the storecode, and quantity attributes)
- Upload your feed through the Supplemental Feed feature
- Request your local inventory feed verification (will take up to 7 days)
Now all you need to do is create a new Google Shopping campaign, enable Local Inventory Ads from the advanced settings drop-down and you’re good to go!
As with your main Shopping feed, I strongly recommend using feed management software to upload and maintain your local inventory feeds, especially because of the manual changes required to the quantity, availability and price fields, which can be easily done in bulk.
Mind you, it’s considered a more advanced feature, which most of the cheapest tools don’t provide, but you can find this feature in medium-priced DataFeedWatch, Feedonomics, and GoDataFeed.
Bonus tip:
If you’re one of the lucky few, you can even track the results of your local inventory ads through in-store conversions (Google’s made it available to a select number of companies)

This leads me to the final tip…
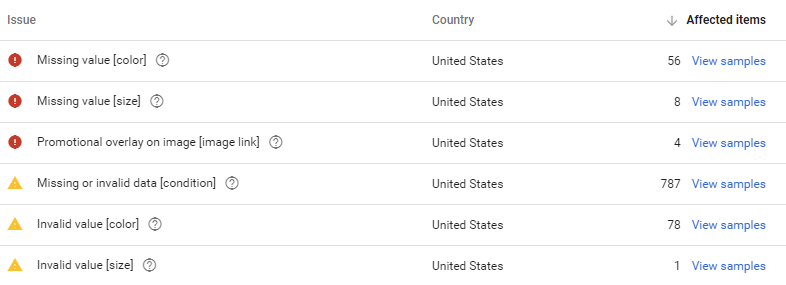
Tip 15: Constantly monitor your Diagnostics tab
The most common mistake I see across Google Shopping advertisers is the lack of diagnostics tab monitoring.
The diagnostics tab is your primary tool when it comes to feed status monitoring and yet many go weeks without paying attention to it, only to later find out that many of their products have been disapproved.
This advertiser had 68 disapproved and over 800 products limited for over a month.
How to optimize it:
Unfortunately, Google disabled Merchant Center feed notifications back in 2017, and currently, the only way for you to stay on top of your product feed status is by checking it manually every week. A quick 1-minute check-up every week is enough, though.
Bonus tip:
Feed management software providers, like Feedonomics, have automated merchant center alerts so you don’t have to check this manually. The price tag is higher than, say, DataFeedWatch’s, but this is as close as you get to leaving your feed on autopilot.
Question time:
Have you tried any of the mentioned optimizations?
How did they affect your results?
Did I miss any?
Let me know by leaving a comment below.

Hi, I tried signing up for Boostmyfeed as you recommended, but it looks like they started charging for the app. Worth updating the article.
Good beginner tips otherwise!
Hey George, thanks for letting me know! I’ve updated the article.
[…] is especially important in the case of Google Shopping, where, as mentioned in our article on 15 Google Shopping Feed Optimization Tips, Google’s algorithm attributes a lot of weight to your product price, and having a price of just […]